

How to Add Payment Gateway to Shopify
Convenient online payment processing is necessary for any good eCommerce business website. Various eCommerce store platforms have unique methods to ensure that customers have different payment methods at their disposal. We’ve previously covered how to add one to a WooCommerce site, so now here’s how to add a Payment Gateway to Shopify.
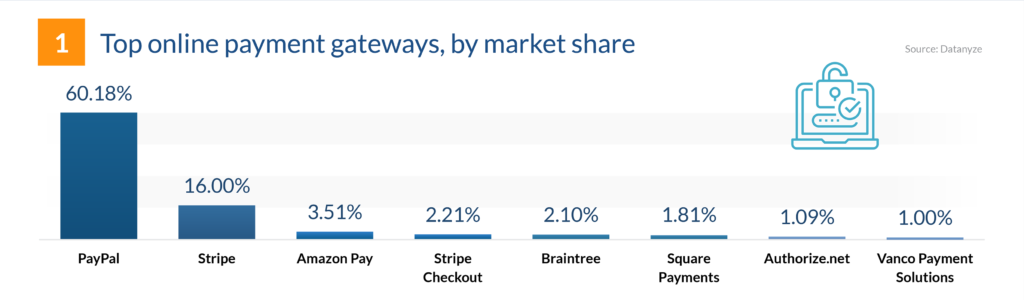
Source: FinancesOnline.
Consumers use digital Payment Gateways like credit or debit cards, digital wallets, bank transfers, and platforms like PayPal or Stripe to purchase from eCommerce stores. Of course, a trusted eCommerce Website Developer from the Philippines can accomplish this for your business. But, business owners must remember that their chosen gateways will determine several things:
- Transaction fees;
- Monthly fees;
- The currencies the eCommerce website can process;
- How quickly they’ll receive payments.
You’ll often find Payment Gateways on business websites that sell products or services. Many eCommerce Platforms are compatible with online payment solutions, such as WooCommerce and Shopify.
Naturally, having the ideal Payment Gateways for your platforms is necessary, and so is hiring the right eCommerce Web Development Company.
Why add Payment Gateways to Your Shopify Store
Though your store may use attractive eCommerce Website Designs, customers may still abandon their shopping carts for various reasons. Baymard Institute found that a limited number of payment methods is responsible for cart abandonment.
Online business owners collect shoppers’ payments with a Payment Gateway like PayPal and a merchant account. Payment Gateways streamline the payment process, which means better customer satisfaction and higher sales.
Any eCommerce Website owner should provide not only a convenient payment system but a safe one. As a result, your Payment Gateway has to have the following characteristics:
- compatibility with your website;
- supports various convenient payment methods; and
- safe from fraud.
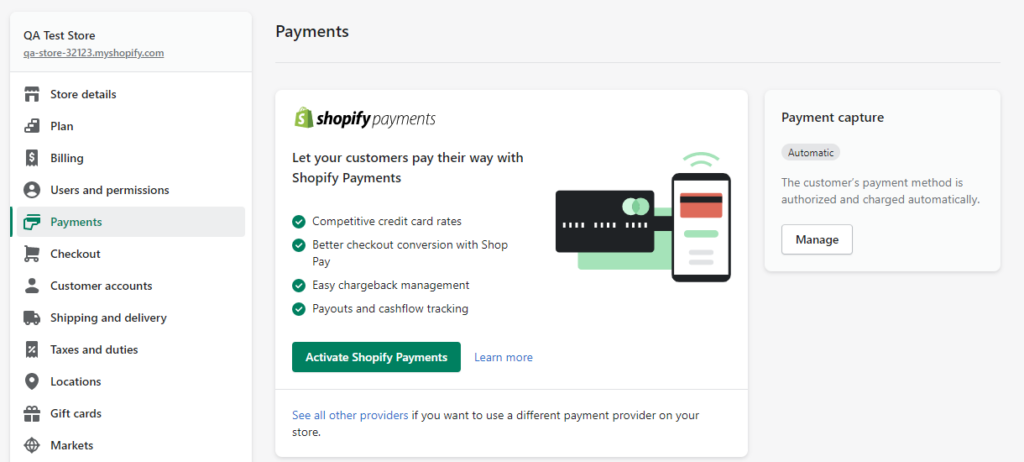
Shopify Payments is a convenient way to accept online shoppers’ payments. Rather than a plugin or extension, Shopify Payments is a built-in feature. Once you create an online store via Shopify, you can automatically accept several popular payment methods. So, relying on third-party payment providers or solutions is unnecessary!
Setting up Payments
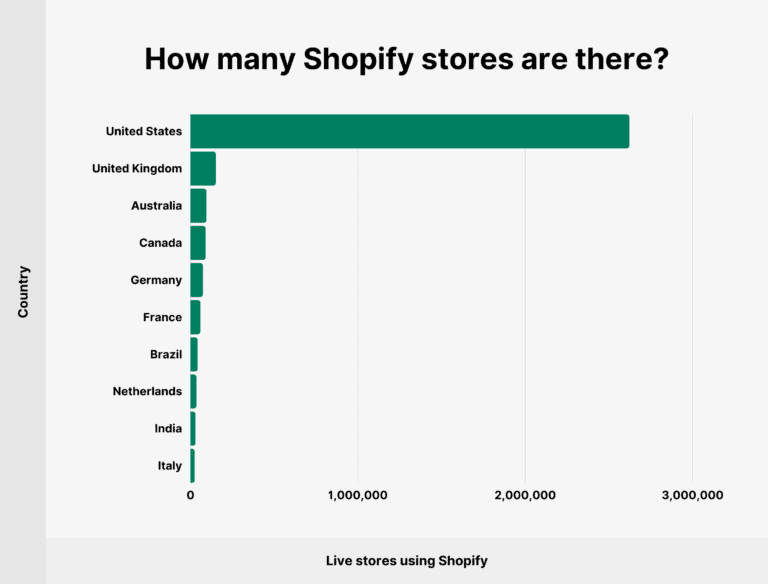
Shopify boasts more than 2.1 million daily active users, proving it’s a trusted eCommerce platform, especially by eCommerce Website Developers from the Philippines.
Naturally, any remarkable Shopify store features Product Pages and checkout carts. To add to your shoppers’ experience, you can even include Thank You Pages to show appreciation and improve time spent on your site. But of course, one of the most critical features of any eCommerce shop is a variety of convenient payment methods.
Shopify understands the needs of its users, so it offers the Shopify Payments feature. To set up Shopify Payments, start from the Shopify settings. Business owners can activate the service from the Payments page.

You’ll need your business registration number or your country’s equivalent, and banking information. In addition, you may need to add other crucial details for the setup process, depending on your location.
Other Things to Know Before Using Shopify Payments
- Firstly, the Shopify Payments service is available to stores in supported countries and regions. Examples of supported countries include:
- Australia
- Canada
- Germany
- New Zealand
- The United Kingdom
- The United States
- If you want to use the service, then you must keep your Shopify account and all payment information safe from malicious individuals. So, keep your account secure with Two-Step or Two-Factor Authentication.
- Shopify Payments won’t charge business owners any additional transaction fees for any orders processed via the following methods:
- Shopify Payments;
- Shop Pay;
- Shop Pay Installments;
- Paypal Express;
- Cash
- Cash on Delivery or COD; and
- Bank transfers.
- However, it’s important to note that Shopify Plus merchants in Austria, Belgium, or Sweden must pay transaction fees.
- It’s vital to check if Shopify Payments supports your business type. If not, you can review other Shopify-supported Payment Gateways.
- Lastly, if you run a retail business, you must check if Shopify Payments supports your country.
Once you’ve finished the Shopify Payments setup, your customers can make purchases via your Shopify store.
Step 1: Switch to Shopify Payments
When you check on your Shopify Payments section, you have a variety of payment methods at your disposal. Let’s say you previously set up other payment providers but want to use Shopify Payment.
So, under the main providers listed in the Payment Methods section, you can see the option to Switch to Shopify Payments. Click on it to start the Shopify Payments setup process for your business.
Step 2: Add Your Business and Banking Details
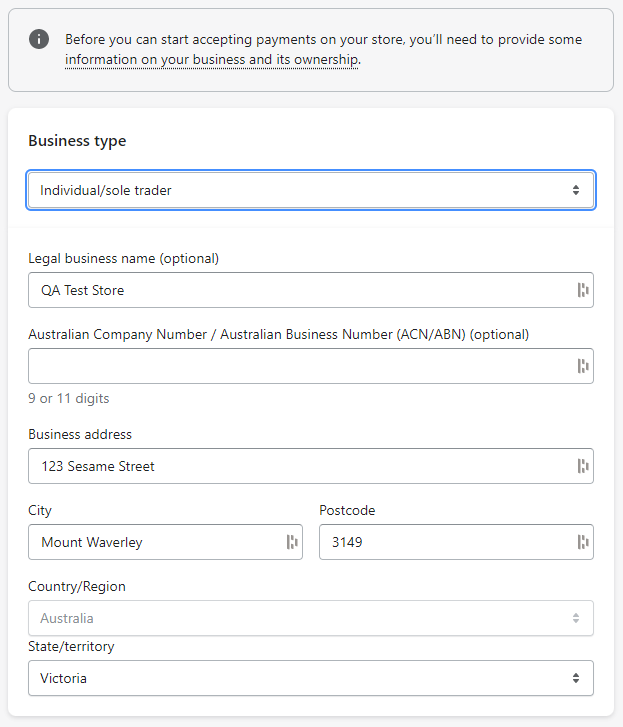
After activating Shopify Payments, you can start adding essential business information. For instance, depending on where your business is based, you can add either your Business Number (BN) or Taxpayer Identification Number (TIN). If you’re a European business, you can add a Value Added Tax number, if applicable. If you don’t have a VAT, just select ‘No.’
Afterward, you should also add your personal and banking information.
As you set up your Shopify Payments, adding details about your business is vital. So if you’re a sole proprietor, you might not have a BN, TIN, or Employer Identification Number (EIN). Instead, you can use your Social Insurance Number or Social Security Number.
If your eCommerce business is a corporation or a limited liability company, you must provide your BN, EIN, or TIN. On top of that, though many people are involved in a corporation, you must provide the personal details of one owner or significant shareholder. These details are necessary for verification purposes.
Configuring Shopify Payments
Much like with SEO efforts, consumers prize a convenient and seamless shopping experience. So, making adjustments to your Shopify Payments is necessary to satisfy your customers.

Here are a few ways to configure your store’s Payment Gateway via Shopify Payments:
Setting Up Payout Notifications
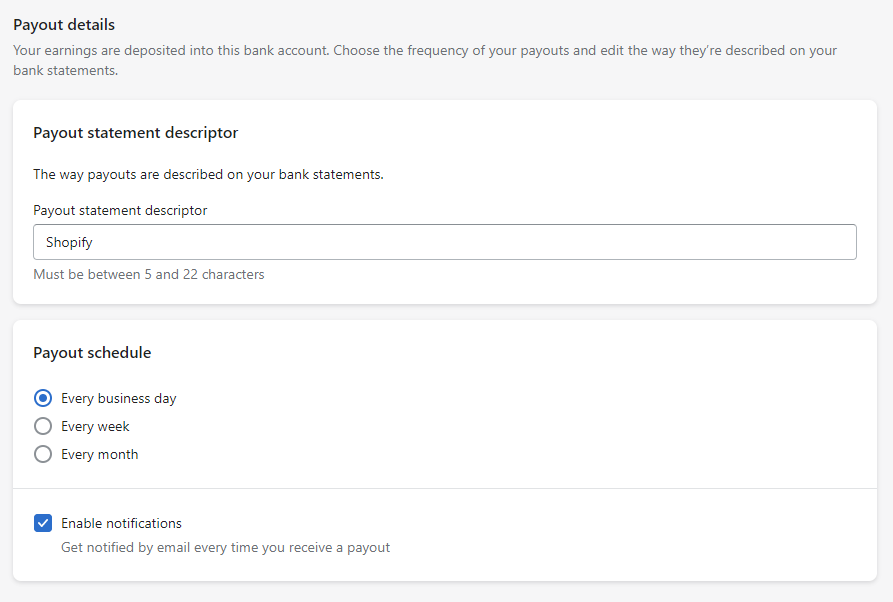
Shopify sends an email notification to you by default anytime your bank account receives a payout. The notification email will indicate the payout amount and a link to it in your store. Thus, it’ll be easier to review the order and customer information. eCommerce business owners can toggle the emails on or off via the settings.
To configure Payout Notifications on desktop:
- Go to your Shopify admin Settings and click Payments.
- Afterward, click Manage in the Shopify Payments section.
- Then, go to the Payout details section, look for the Payout schedule, and toggle the Enable notifications setting.
- Don’t forget to click Save before configuring Shopify Payments settings!
If you’re on an iPhone or Android device, here’s what you can do:
- Go to the Shopify application’s Store, then go to Settings.
- Once there, you can tap the Payments section, then click Manage.
- Like with the Payout notifications desktop guide, you must go to the Payout details section. Under the Payout schedule headings, toggle Enable notifications as needed.
- Lastly, click Save once you’re satisfied with your Payout notifications settings.
Setting Up Fraud Prevention
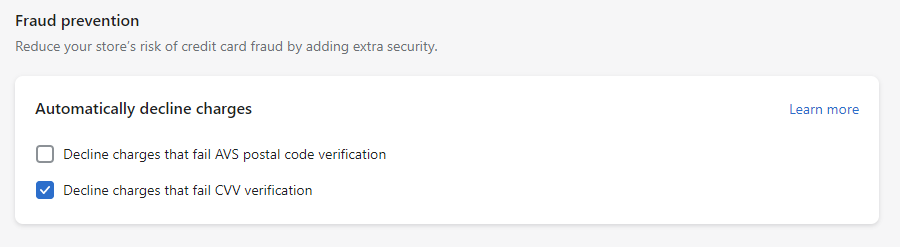
The great thing about Shopify Payments is that it performs enhanced fraud analysis when processing transactions. You can find fraud analysis indicators on customer orders. That way, you can use the analysis results to decide whether or not to fulfill the order. Though this is an excellent feature, it isn’t available for Shopify Payments users in France.
When configuring the best Payment Gateways for Shopify, an eCommerce Website Developer from the Philippines can enable two fraud filters on Shopify Payments. These are the Address Verification System and Card Verification Value.
Address Verification System (AVS)
The AVS will compare the numeric parts of a buyer’s billing address and zip or postal code to the credit card issuer’s information on file.
Card Verification Value (CVV)
The CVV is found on a consumer’s credit card. The three- or four-digit number code is proof that the customer physically has the card.
You can automatically decline a transaction if it fails verification against either or both filters. As a result, the Shopify store order will not be placed. To keep your store fraud-proof, activate the Decline charges that fail AVS postal code verification and Decline charges that fail CVV verification settings.
But before activating these fraud prevention measures, business owners should note that not all banks will support AVS and CVV security checks.
To set up fraud prevention on desktop:
- Start by going to the Shopify admin Settings and clicking Payments.
- Select the Manage option, and look for the Shopify Fraud prevention section. There, you can tick the options necessary for automatically declining charges.
- Lastly, Save the changes you’ve made in your Shopify Payments Settings.
To do the same on iPhone or Android:
- Go to the Store on your Shopify app, then to Settings.
- Click Payments to be directed to the Shopify Payments section.
- Next, select Manage and find the Fraud prevention section. Toggle the settings necessary for automatically declining customer charges.
- Finally, click Save once done with the Fraud prevention setup.
Editing Your Bank Account Details
You must make the appropriate updates in the Shopify Payments settings if you change bank details — whether it’s changing account details or switching to another bank. But to make updates, you must verify your old bank details. If you forgot your old account details or cannot verify them, contact Shopify support.
In addition, for security reasons, the store owner is the only person who can edit the business banking information on Shopify Payments.
You can edit your bank account information via desktop.
- First, go to the Payments Settings on your Shopify admin.
- From Shopify Payments, select Manage and look for the Payout details section.
- Find the Payout account heading; under that, click the Change bank account option.
- Add the necessary information before clicking Save!
eCommerce store owners can do the same on their iPhone or Android devices.
- From your app, find the Shopify Payments heading in Store settings.
- Select Manage in Shopify Payments.
- Then, search for the Payout details section, just like with the desktop setup process.
- Click Change bank account under the Payout account heading.
- There you can enter the account information and Save it once done.
Testing Your Checkouts
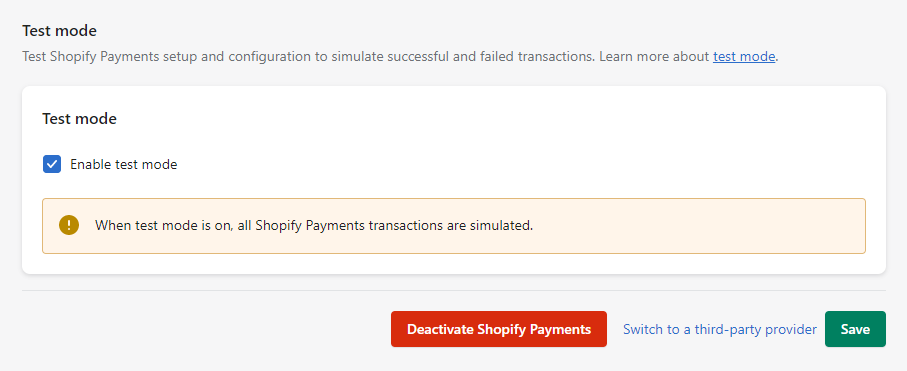
You can activate test mode if you want to simulate your Shopify Payments. Not only do you get to see how customers can pay for orders, but also how your business can process them. Unfortunately, test mode is unavailable for France-based merchants.
In this mode, you can simulate test credit card payments rather than using payments from an actual card. But, test mode doesn’t allow you to test local payment methods in the checkout. Thus, eCommerce store owners shouldn’t activate test mode if your store is still in production.
So, to test your checkout process and make a test order, you should ensure Shopify Payments isn’t in use. However, be warned not to fulfill test orders, as Shopify charges you for them.
To start testing your checkout process via desktop:
- Go to Shopify Payments on the Shopify admin Settings.
- Select Manage in Payments and look for the Test mode section.
- Click Enable test mode to place test orders.
- Once done, eCommerce shop owners should remember to click Save.
As for iPhone and Android, go to the Store settings, click Payments, and then select Manage. Find the Test mode section, then tap Enable test mode and Save before you start making test orders.
Final Thoughts
Your chosen payment method must add value to your eCommerce store. Of course, you can select any eCommerce platform to set up an online storefront. But for many businesses, WooCommerce and Shopify are popular — though excellent — choices.
Source: Backlinko.
In particular, Shopify has a convenient Payment Gateway solution in the form of the aptly-named Shopify Payments. The gateways you use on your Shopify website will determine several things, such as transaction fees and how quickly your business receives payments. Websites with built-in payment systems make an online shopper’s experience more appealing.
So, you need to ensure your payment methods can meet the demands of consumers. Not only that, but your Payment Gateways should be protected from fraud or cyberattacks. So, consult a trusted eCommerce Website Developer from the Philippines to help ensure a seamless payment experience.
About Adam Tan
Adam is a charming geek who loves his family's Siberian Husky, enjoys the occasional night out with friends and, most of all, lives and breathes new trends and updates about the web and its technicalities. If you want to stay updated with changes or new trends on the web or learn about the technicalities that are involved, he's your guy. He's capable of writing cheesy stuff as well, but he'd rather stick with the manly stuff.
- Find more about me on:


Related News:


What is a Website Sitemap & Why is It Important?

Automate Your Patients’ Records Now with OB-Gyn App


Comment 0