

The WordPress Staging Workflow: How to Test Changes Without Breaking Your Live Site
A WordPress staging workflow gives you a private copy of your live site. You test layout, plugin, and content changes there before visitors see them. Staging runs under settings close to production, so you spot broken pages, plugin conflicts, and failed forms early.
Most projects use up to three environments: local, staging, and live. If a plugin update breaks your checkout page, you fix the problem on staging while customers keep buying on the live site. Small business sites often need only staging and live. Agencies and custom builds add a local environment.
Here’s a quick overview of website development stages and their purpose:
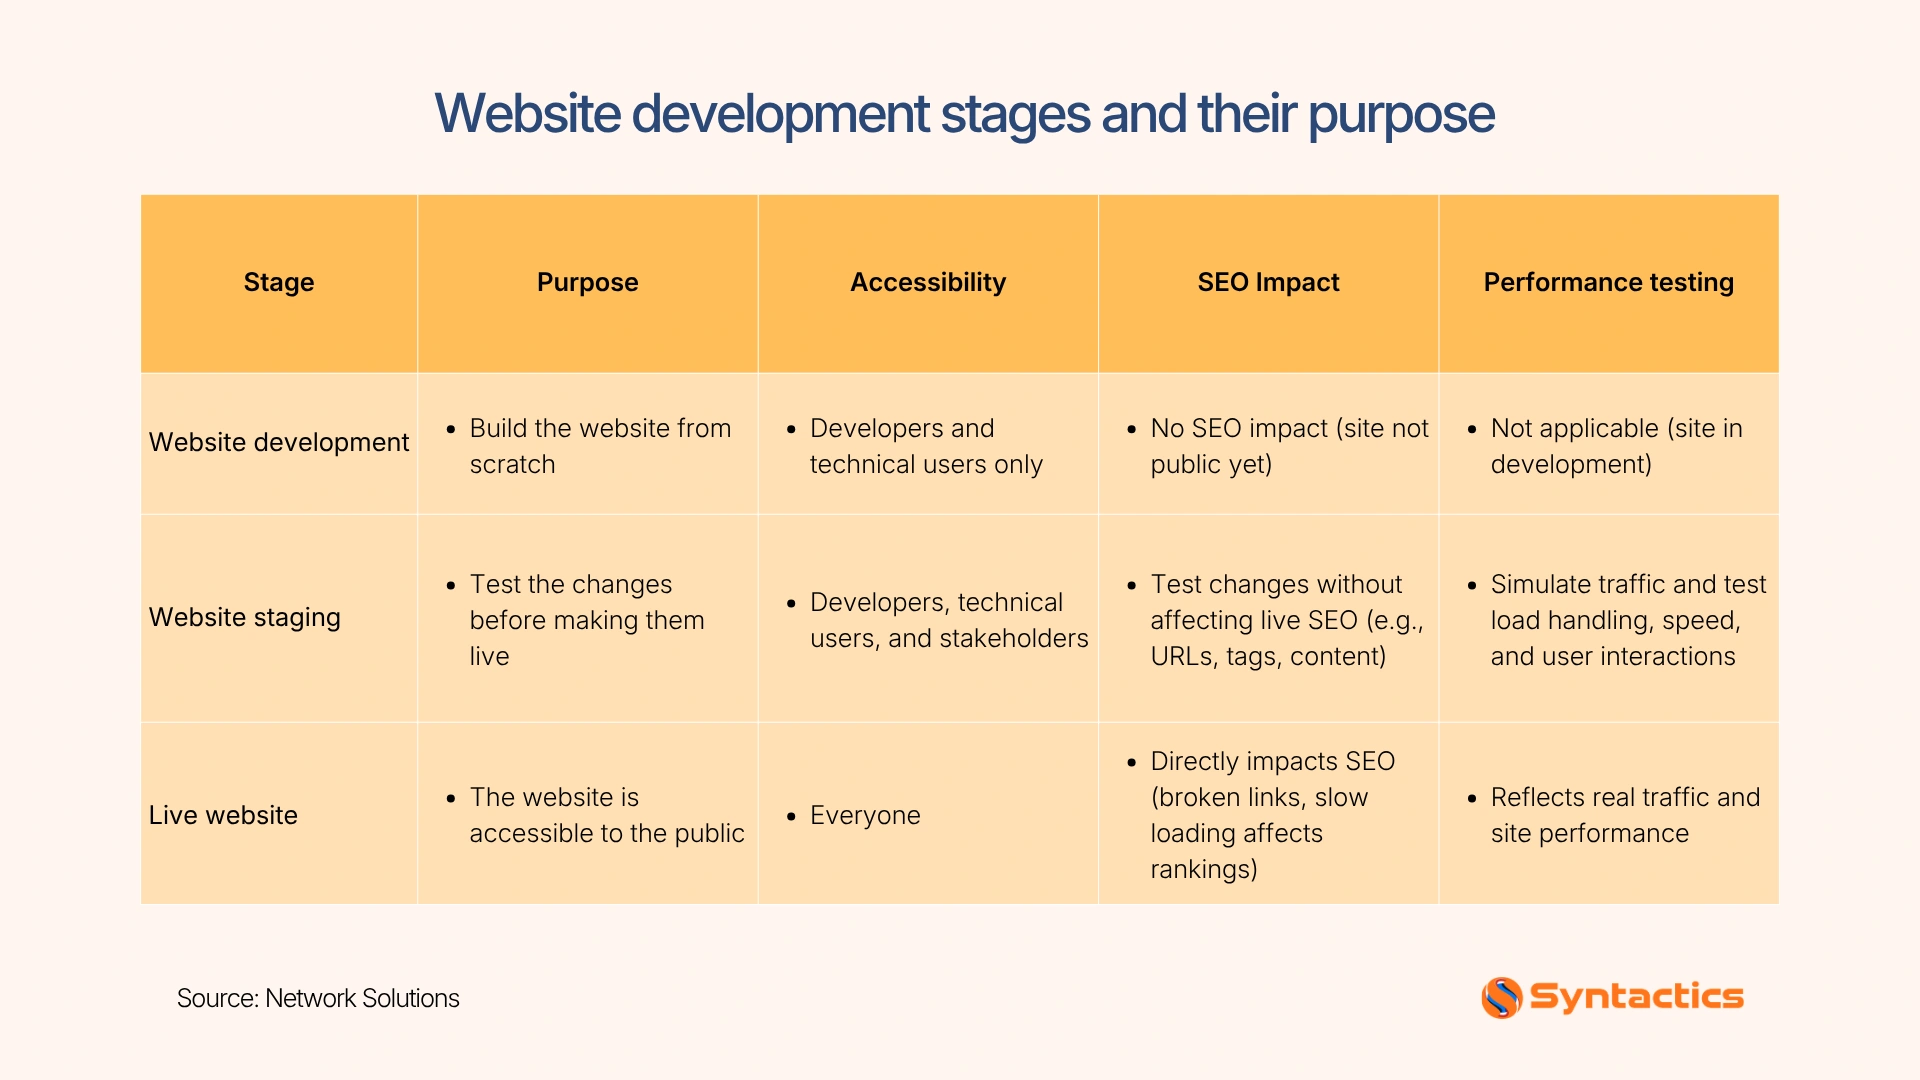
Source: Network Solutions
Key Takeaways
- A WordPress staging workflow uses local, staging, and production environments to configure website changes without disrupting the live website.
- Protect the production database because overwriting it with an older staging copy can erase new live records.
- Create secure testing environments by refreshing staging data, sanitizing sensitive info, blocking indexing, disabling live notifications, and using test gateways.
- Back up the live site, deploy approved changes using proper migration methods, check core functions, and verify post-launch performance.
- Coordinate with clients and teams through documented feedback, written approvals, and content freezes while keeping live transactions uninterrupted.
3 Environments of a Website Staging Process
WordPress staging environments support a specific stage of website development. According to WP Engine’s Environment Documentation, they operate independently to improve development workflows by adding flexibility and security.
Local Environment
A local environment lets developers build pages, adjust WordPress themes, test plugins, and troubleshoot code on their computers. It suits isolated development and early testing. For instance, a business in the Philippines hires a web developer to redesign a contact form locally before moving it for further testing.
Staging Environment
The staging environment lets design and development teams evaluate changes under conditions similar to production. It helps identify layout problems, plugin conflicts, broken links, and integration issues before website visitors encounter them. In particular, in website design in the Philippines, teams test every feature before launching the site live.
Production Environment
The production environment is the public-facing website where visitors complete intended actions. It contains live content, customer information, and active transactions, so changes require careful deployment and a verified backup. To take one example, if a tested checkout flow development is deployed, live orders and database records remain safe from being overwritten.
WordPress Database Dilemma
WordPress combines files, themes, plugins, and databases to manage website activity. Files control much of the site’s appearance and functionality. Meanwhile, the database stores posts, blog comments, WooCommerce orders, and layout settings.
If you copy the entire staging database over the live database, you can overwrite newer production records that staging does not contain. This structure creates a challenge when moving changes from staging to production.
For example, website staging was set up on October 20 with 120 orders. Over the past two days, customers placed an additional 35 orders on the live site, bringing the total to 155 orders. If staging overwrites production, it could erase new order data. To keep data intact, migrate only the necessary changes in the entire production database.
How to Set Up a Testing Environment for Each Stage
Here’s a quick guide on how you can lay out the framework for WordPress staging at each stage of web design and development:
Setting Up Local Environment
One way to build and test WordPress websites on your computer is using development tools. For instance, LocalWP’s Local Connect feature supports hosting integrations that can pull websites into local and allow remote changes.
Here are the steps to set up a local environment:
- Install LocalWP and create a new local site.
- Pull your live site with Local Connect (WP Engine and Flywheel) or with a WP Migrate export on other hosts.
- Build and test theme, layout, or plugin changes on your computer.
Local environments are best suited for isolated development and early troubleshooting. Before moving to the staging environment, test the website on its hosting configuration, check integrations, or obtain client approval.
Configuring Your Staging Site
Match your staging site to production so tests reveal real compatibility problems. Pick the route that fits your site.
Small business and brochure sites: use your host’s one-click staging. WP Engine, Kinsta, SiteGround, and Cloudways all offer it. Create the copy in your dashboard, test, then push to live. Without host staging, use the WP Staging plugin or another compatible website migration plugin.
WooCommerce stores: never push the full database. Use WP Migrate Pro to move only the tables you changed, and leave order and customer tables alone. For theme and plugin changes, push files only, then apply settings changes by hand on the live site.
Before conducting a test, it’s important to complete this checklist:
- Block search engines from indexing the staging site.
- Disable live email notifications or redirect them to a test inbox.
- Set payment gateways to test mode.
- Password-protect the site and restrict access to authorized reviewers.
- Backup your WordPress site with tools.
These safeguards prevent duplicate search results and reduce the risk of sending fake messages or processing unintended payments.
Synchronizing Production to Staging
Staging is less reliable when it uses outdated plugins, settings, or content. Refresh it before major tests, but protect personal information by removing or anonymizing customer data wherever possible.
A typical refresh involves copying the production database to staging. Then, replace production URLs with staging URLs and check environment-specific settings. Developers can use the official WP-CLI search-replace command to update URLs while preserving serialized data.
Say, replace https://example.com with https://staging.example.com, then verify the results. Run a dry run first and exclude sensitive tables when appropriate. Lastly, never send a sanitized staging database back to production without reviewing its contents.
How to Safely Make Changes on the Live Website
The right deployment method depends on whether the change affects files and database records. Here’s how you can safely make changes without breaking the live website:
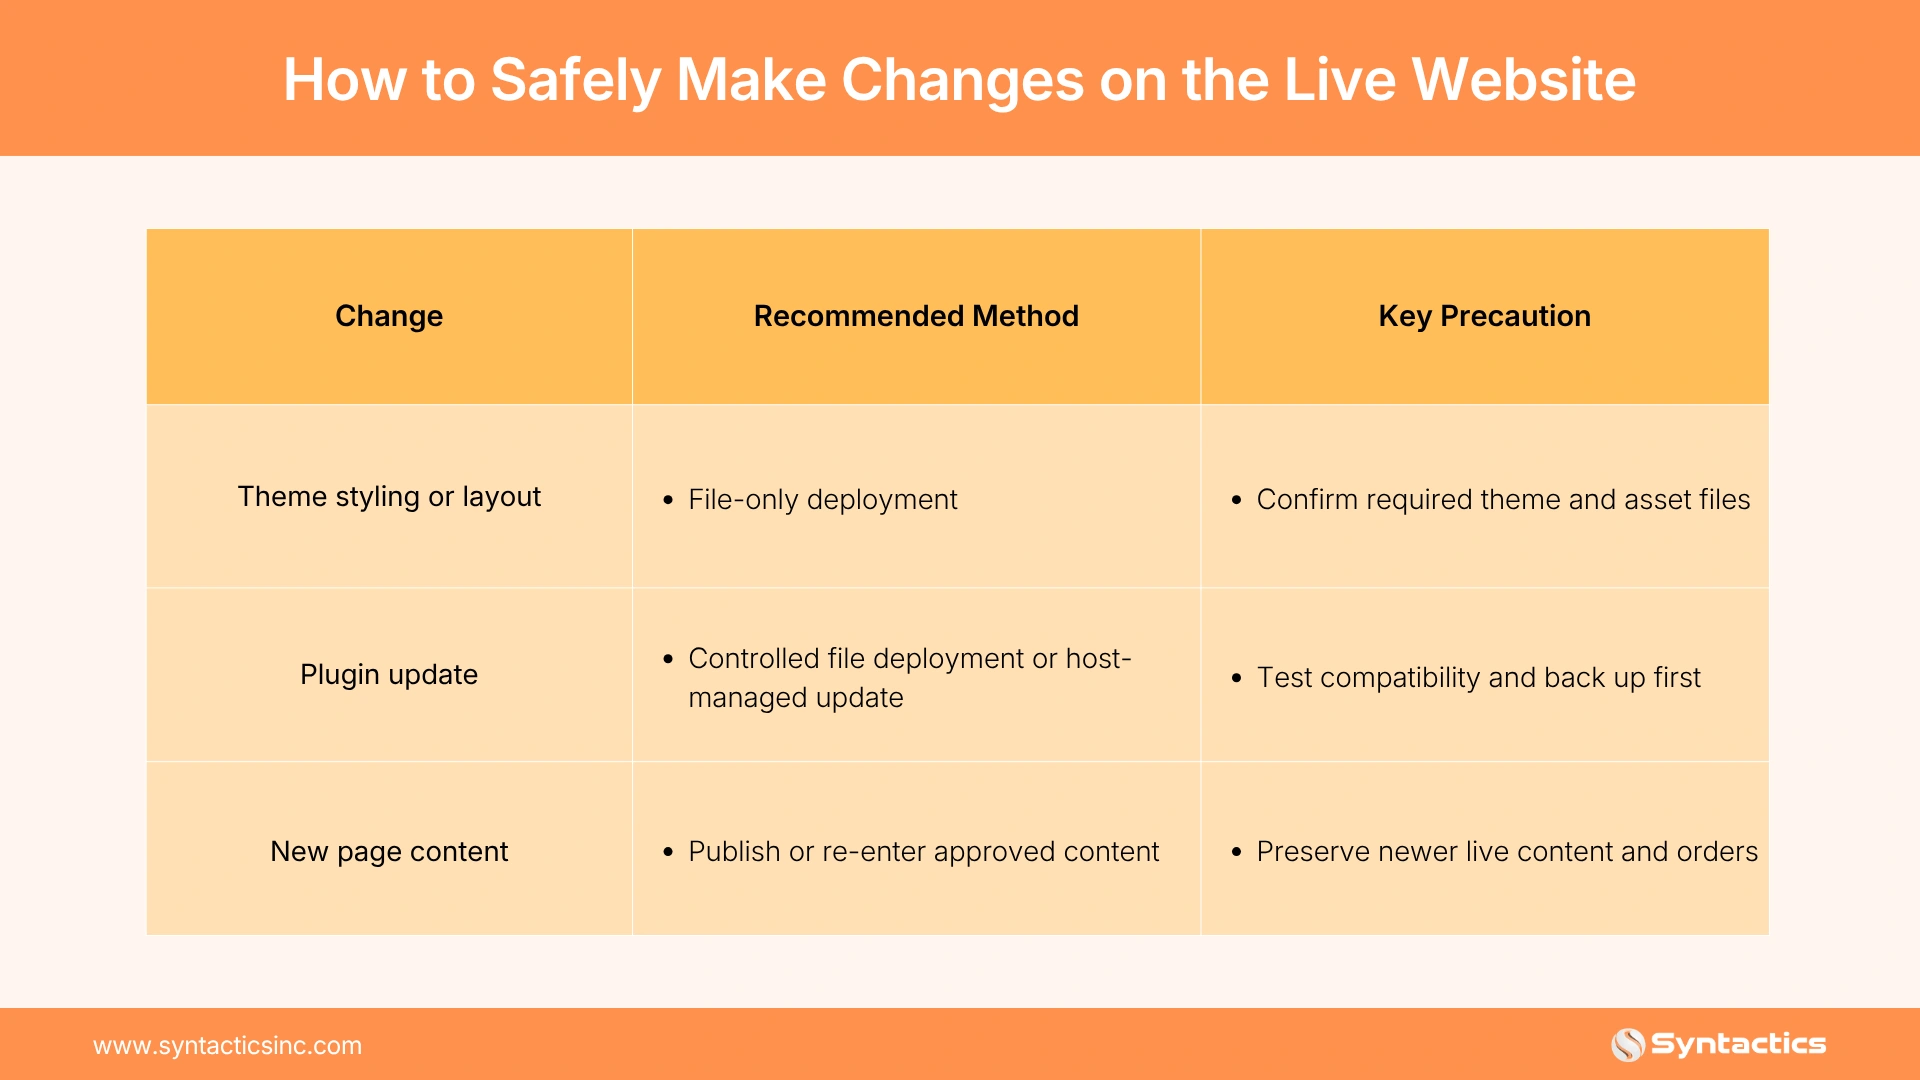
Before launch, back up production, confirm the approved changes, check links and forms, verify mobile layouts, and test essential functions. After deployment, clear relevant caches and run another round of checks on the live site.
When to Use Content Freeze
Even after a website passes staging tests, new edits to the live site can complicate deployment. For this reason, teams may use a content freeze to temporarily pause specific content changes while they transfer approved updates to production. This approach helps prevent new edits from being overwritten or conflicting with the deployed changes.
To keep the process manageable, schedule the freeze for the shortest practical window and notify team members in advance. Explain which pages or sections they should avoid editing and when they can resume publishing. However, an active WooCommerce store should continue accepting orders during this period. In this case, selective migration is better to preserve new orders and customer activity.
Working With Clients and Content Teams
A clear approval process prevents conflicting edits and last-minute surprises. To minimize bottlenecks, share the staging link with authorized members. Then, collect feedback in one document and obtain written approval before deployment.
During review, ask clients specific questions about page content, images, navigation, forms, and mobile layouts. WordPress website design and development teams can use this documented process to coordinate technical fixes while staying on track.
Protect Your Live Website With a Safer Launch Process
A structured WordPress staging workflow gives your team room to experiment, identify errors, and approve changes before they affect visitors. By separating environments and protecting live database records, you can reduce avoidable downtime. The right deployment method also lets you launch with greater confidence.
For businesses investing in WordPress design and development, a dependable testing process should start early. Our expert team brings a structured approach to website projects, focusing on building and maintaining functional, user-friendly websites. To see how we keep your website secure and scalable, get in touch with us today!

Frequently Asked Questions (FAQs)
Do I need a staging site?
Yes, you may need a staging site if you regularly update plugins, themes, custom code, or critical website features. It helps you test changes before they disrupt visitors or sales on the live site.
How often should a WordPress staging site be refreshed?
Refresh your WordPress staging site before major releases, compatibility tests, or changes that require current production data. For active websites, protect sensitive data, and preserve live transactions when synchronizing data.
Should every WordPress change go through staging?
If a change could affect functionality, security, layout, or performance, test it in a staging before deployment. Minor content edits may not require staging if you have a reliable review process.

About Ladymieh Naallatan
Related News:

How Software Helps Businesses Avoid Tech Crises






Comment 0